THIS PROCEDURE MUST BE PERFORMED BY A QUALIFIED TECHNICIAN.
Remove Knockouts
Remove the applicable knockout(s) from the bottom of the enclosure in the low voltage connection area (See Component Location #11).
Install Indoor Sensor
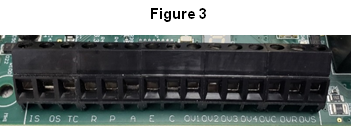
Indoor transceivers have a factory-installed indoor sensor. If installing an indoor transceiver, connect an outdoor sensor (Part #1302044) to the OS and TC terminals (Figure 3) on the low voltage terminal block.

Install Outdoor Sensor
Outdoor transceivers have a factory-installed outdoor temperature sensor. If installing an outdoor transceiver, an indoor sensor (Part #1302024) can be connected to IS and TC (Figure 3) on the low voltage terminal block.
Install Peak Control
If the transceiver you are installing will be controlled by the power company’s meter device (not controlled by Steffes Connect), wire the metering device to the R and P positions on the low voltage terminal block (Figure 3). If the transceiver is equipped with umbilical cord (flexible conduit), connect the metering device to the blue and blue/white wires.