THIS PROCEDURE MUST BE PERFORMED BY A QUALIFIED TECHNICIAN.
-
Turn power on to the transceiver.
-
Look at LED-L3. It should blink OFF-and-ON slowly then increasingly faster until it locks ON indicating it has received PLC signal from the transmitter.
NOTE: It can take 2-3 minutes for PLC signal reception when using a “fast” channel and 7-10 minutes when using a “slow” channel.
-
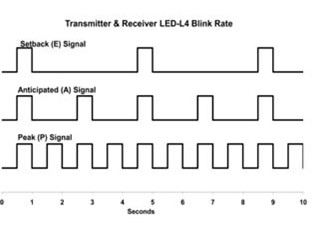
Look at LED-L4, (2). It may be:
-
OFF when receiving an off-peak signal
-
ON solid if an override switch is enabled
-
blinking OFF and ON according to the type of signal being received from the control device.
-
-
Simulate an off-peak period at the transmitting device.
-
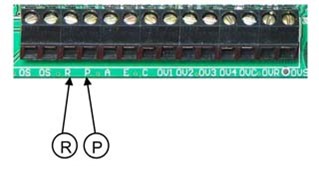
If DIP switch #1 is in the ON position at the transmitting device, this can be done by placing a jumper wire across the R and P terminals.
-
If DIP switch #1 is in the OFF position at the transmitting device, an open across R and P will simulate the off-peak period.
-
LED 4 should be OFF.
-
The relay LED’s should all be ON.
-
Go to each controlled load (appliance) and make sure it is operating.
-
-
-
Simulate a peak period at the transmitting device.
-
If DIP switch #1 is in the OFF position at the transmitting device, this can be done by placing a jumper wire across the R and P terminals.
-
If DIP switch #1 is in the ON position at the transmitting device, an open across R and P will simulate the peak period.
-
Look at the relay LED’s. They should all be off.
-
Look at LED-L4. It should be blinking at the peak rate as shown.
-
If one of the optional overrides has been installed, verify proper operation of the override device.
-
-
NOTE: When checkout is complete, make sure:
-
DIP switches are all set to the proper position.
-
Jumper wire has been removed.
-
All wiring connections are tight.