Theben Time Clock Replacement Instructions - TR610 Top2

yellow triangle with lightning boltWARNING

HAZARDOUS VOLTAGE: Risk of electric shock. Can cause injury, or death. System may be connected to more than one branch circuit. Disconnect power to all circuits before servicing.

Outline

REPLACEMENT

Disconnect Power

De-energize the system.

Remove Old Time Clock

For time clocks mounted on din rail, remove the existing time clock from the mounting rail. Pry down on the tab located at the bottom of the clock (Figure 1) and pull outward.
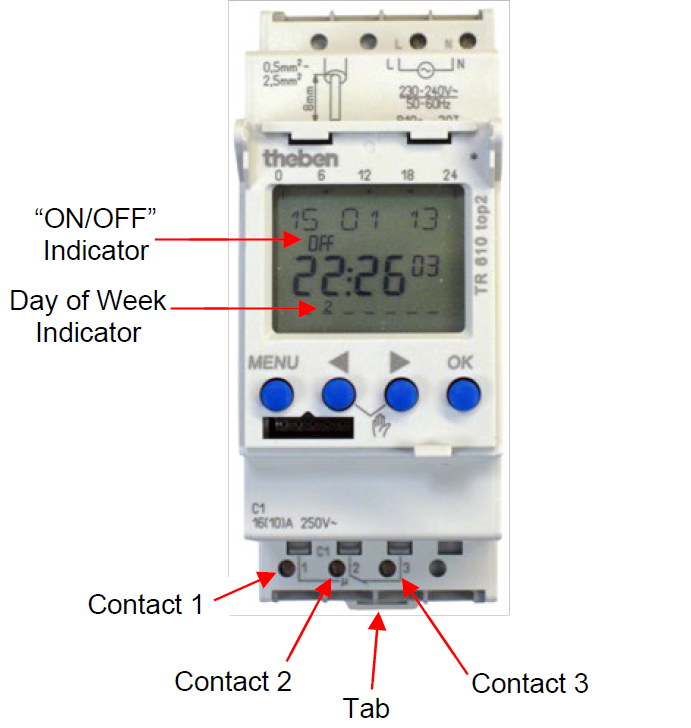
Time Clock with Terminals indicatedzoom in on pictureopen image

Figure 1

Install New Time Clock

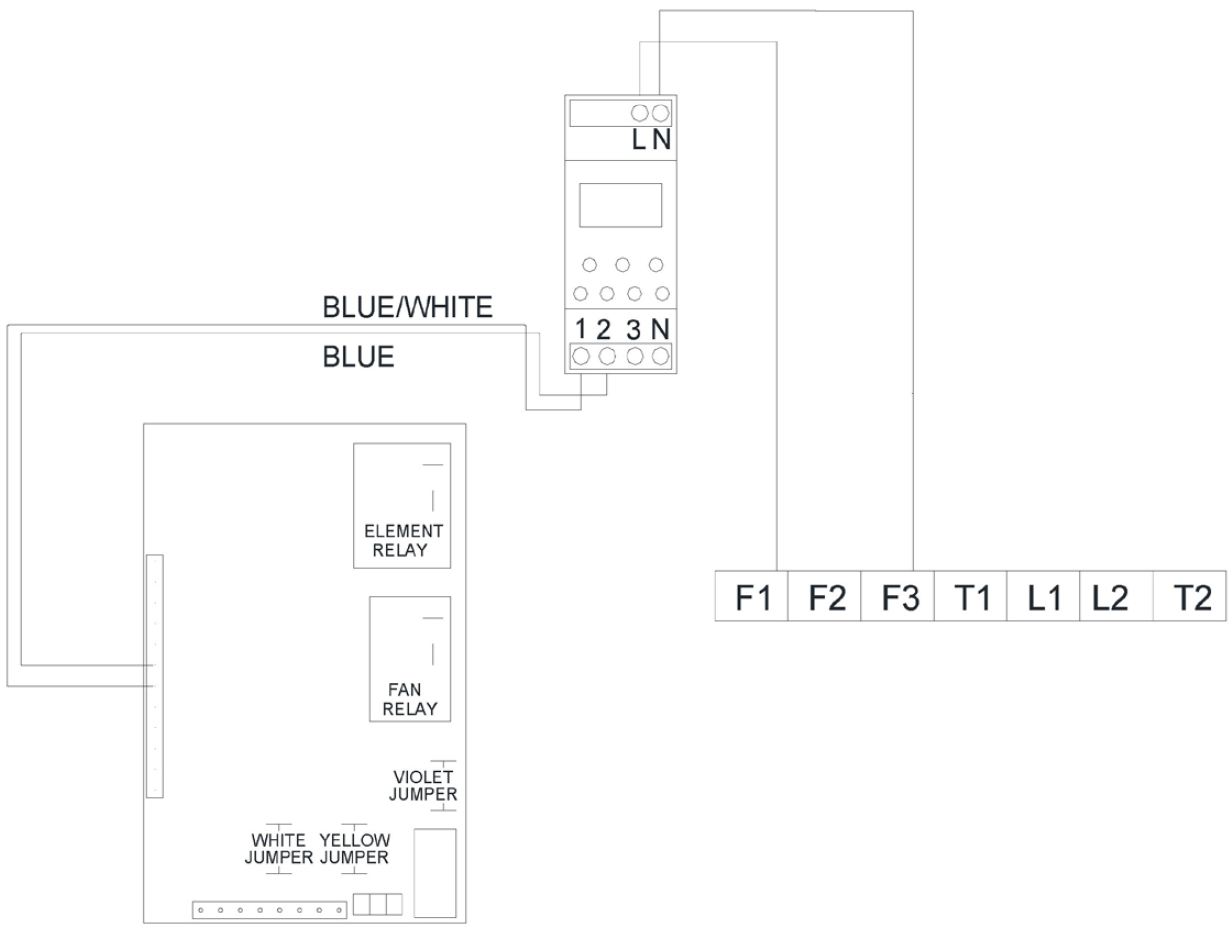
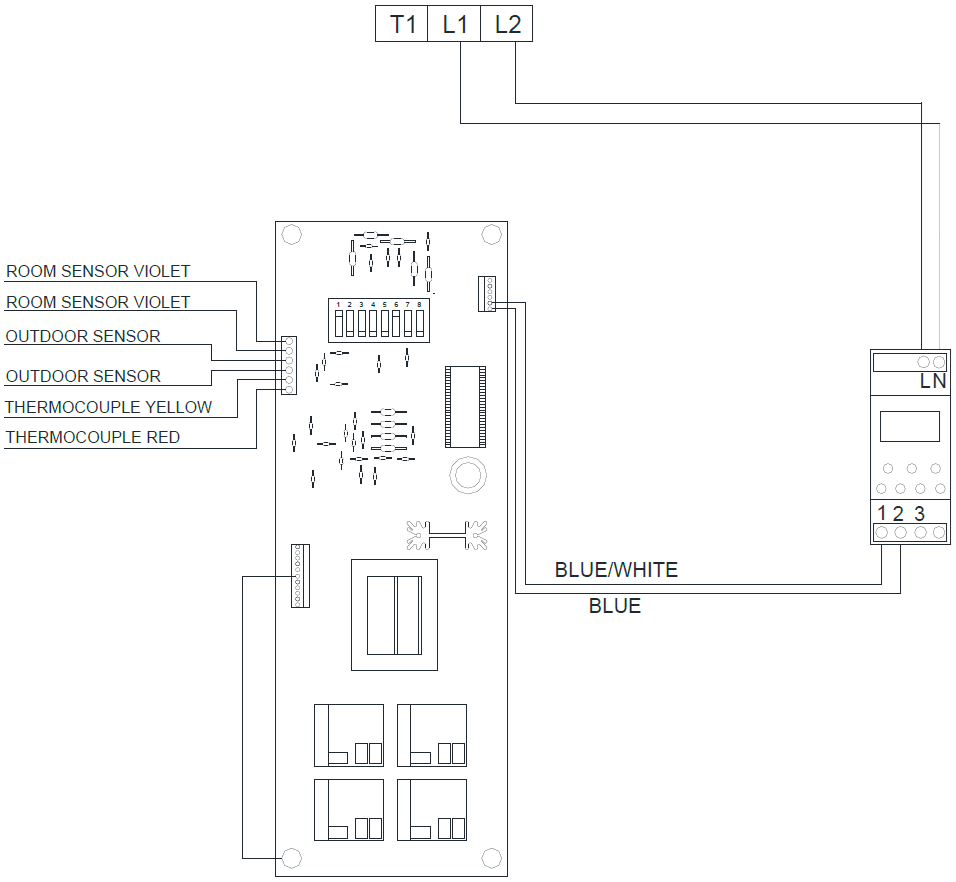
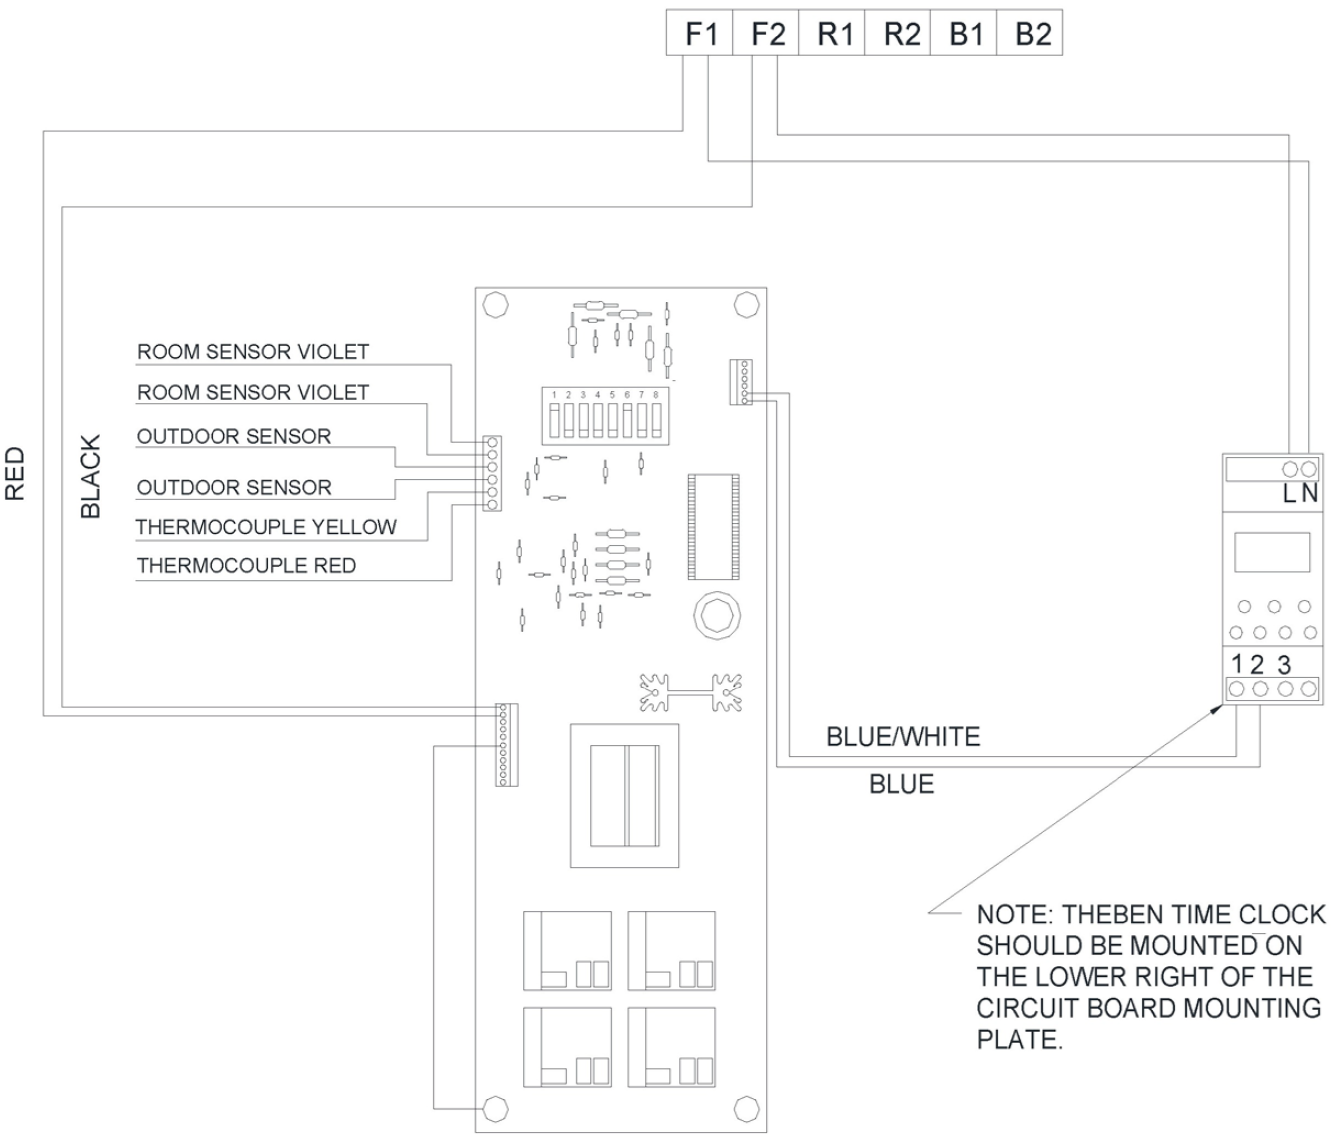
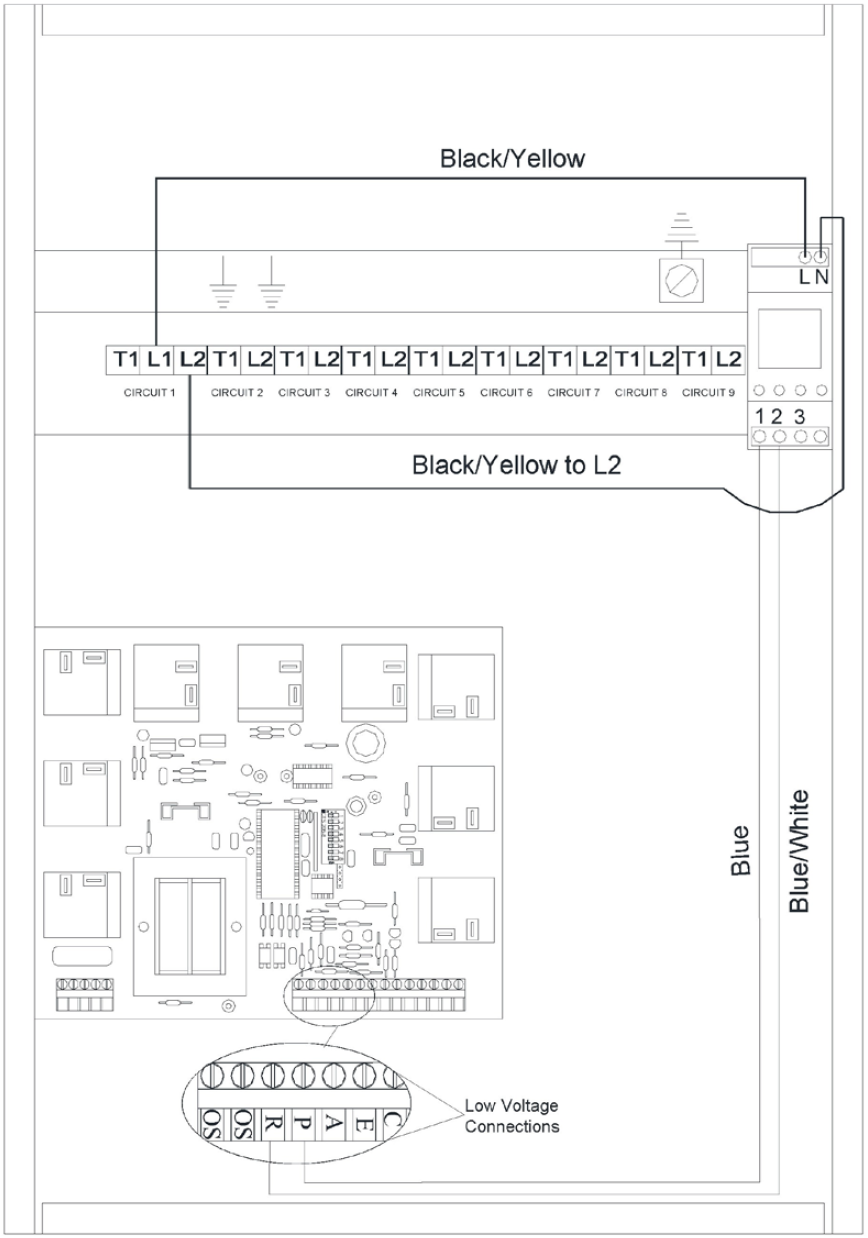
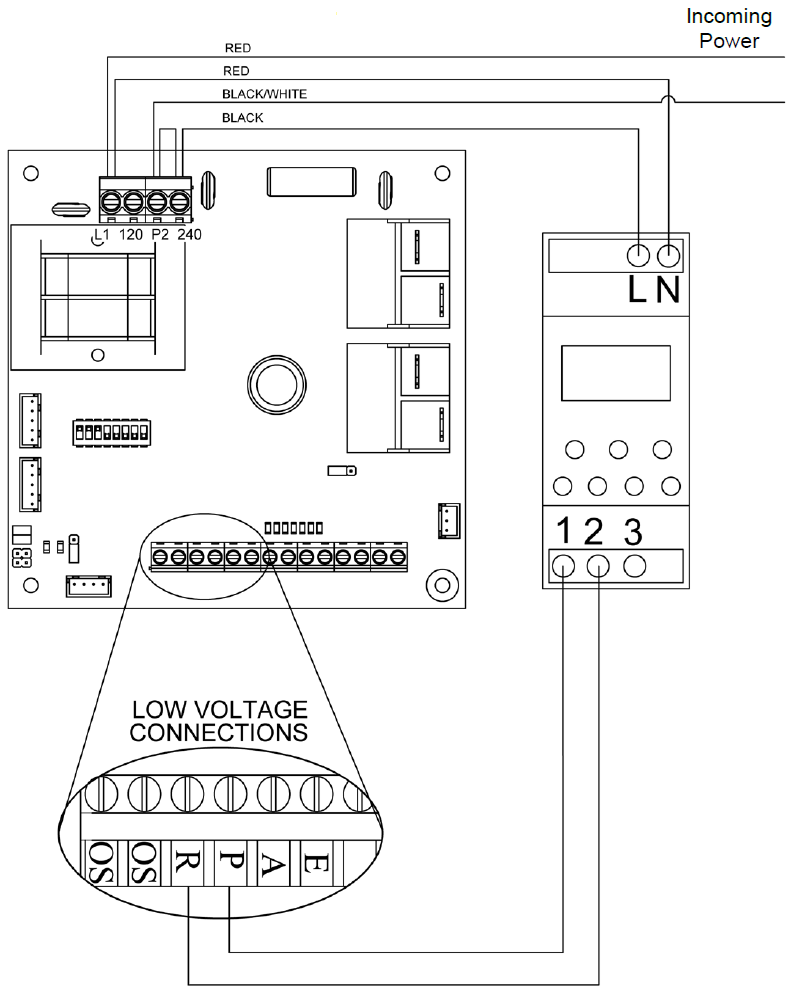
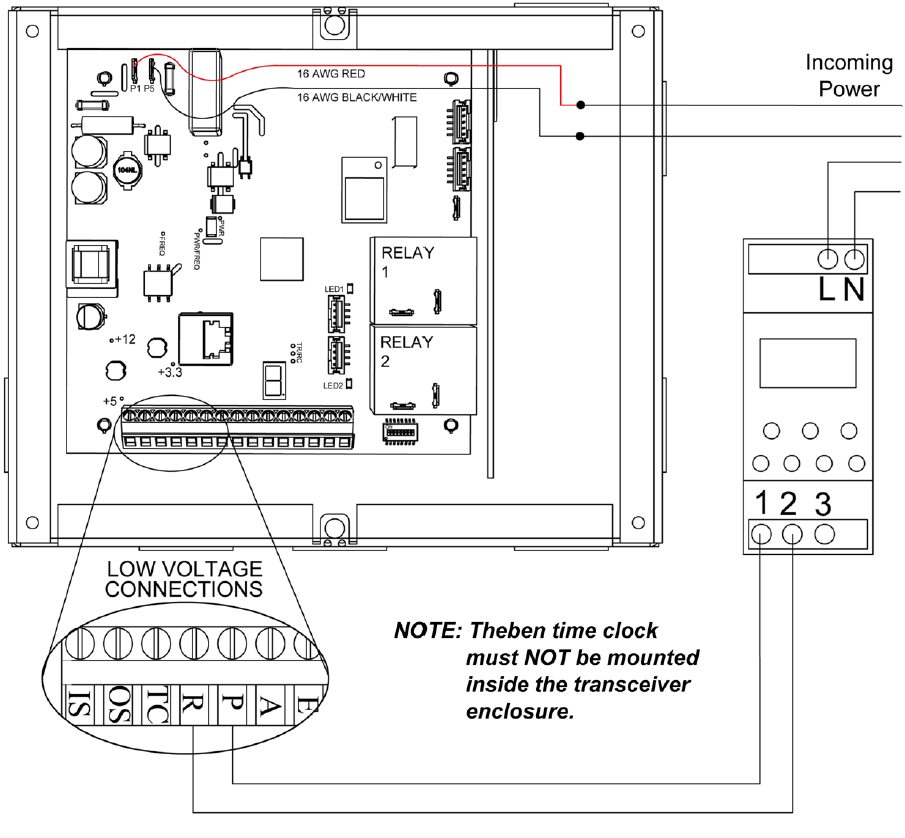
Position the new click on the appropriate mounting bracket and connect wiring in accordance with the wiring diagram for the application (Figures 2 - 7 below▼).

SETTING THE TIME Top▲

Throughout the programming of the time clock, if there is approximately 90 seconds of inactivity (no buttons are pushed), the display will automatically reset to normal operation. If the clock resets and the program information you are entering or editing is not stored, the time clock will default to the previous settings. The new information will have to be reprogrammed.

NOTE: The Theben time clock is equipped with a lithium battery with an approximate 10-year life expectancy.

Activate the Time Clock

The time clock is delivered in a "sleep" mode. To activate without a service voltage, press and release one of the four buttons.

Reset Clock

Press and hold “MENU” and “OK” buttons until display goes blank. Press “OK”.

NOTE: To navigate through the menus below, press the "◄" or "►" button. Press the “OK” button to save each selection and move to the next one.

Select Language

Select the national language.

Format Date

If “Form Date” appears, select the desired format – mm/dd/yy, yy/mm/dd, dd/mm/yy.

Set the Year

Set the current year.

Set the Month

Set the current month.

Set the Day

Set the current day of the month. This display will show the day followed by the month (i.e. 09.01 is September 1st).

Format Time

If “Form Time” appears – select 12 hr or 24 hr clock.

Set the Hour

Set the current hour. Verify the correct am/pm hour is selected if using a 12-hour clock.

Set the Minute

Set the current minutes .

NOTE: The time clock should continue with setup of daylight savings time; however, it may return to the normal operating mode and skip the daylight savings section. If this occurs, press the "MENU" button until the "" is flashing at the top of the display. Press "OK" and repeat Steps 3-8.

Set Daylight Savings

To set whether or not daylight savings time (DST) will be utilized, press the "►" button until "SUM/WIN" is displayed. Press "OK".

  1. With Daylight Savings Time

    • Press the "►" button until "WITH S/W" is displayed. Press "OK".

    • Use the "►" button until "USA/CAN" is displayed. Press "OK".

  2. Without Daylight Savings Time

    • Press the "►" button until "NO SU/WI" is displayed. Press "OK".

Verify

The clock will return to the time/status display and the day of the week should automatically be indicated by an arrow (1 = Monday...7 = Sunday) at the bottom.

SETTING THE CHARGE (ON) AND CONTROL (OFF) CYCLES Top▲

NOTE: Start times for each charge (on) and control (off) cycle MUST be set. To ensure proper operation, the first program setting should be charge (on). If the first cycle would normally be control (off), set a 12:00 a.m. charge (on) time as part of your schedule.

Press Menu Button

Press the "MENU" button until "Program" is displayed in the upper portion of the display. Press "OK".

Select "NEW"

Use the "◄" or "►" button until "NEW" is displayed. Press "OK". "MEM FREE" and a number will automatically appear after a few seconds to indicate how many program locations are available. There are 56 program locations available if no program settings have been entered.

Set "Time On"

The clock will automatically display "ON" or "OFF" toward the top of the display. Below this, "On" or "Off" will be flashing. Use the "◄" or "►" button until "ON" displays and press "OK" to set the charging period.

NOTE: “ON” is a charging cycle and “OFF” is a control cycle.

Adjust the Hour

"HOUR" will be displayed across the top. Use the "◄" or "►" button to adjust the hour. Press "OK".

Adjust the Minute

"MINUTE" will be displayed across the top. Use the "◄" or "►" button to adjust the minutes. Press "OK".

Select the Day of the Week

"MONDAY" will display. Select the days of the week that this particular program setting pertains to by using the "◄" or "►" button until the first day of the cycle is flashing. Press "OK" and "COPY" will flash. Press "OK" and "ADD TUESDAY" will appear. Continue to press "OK" to select the desired days. To bypass a day, press "►". After "ADD SUNDAY" is displayed and/or selected, "SAVE" flashes on the display. Press "OK". "NEW" will flash across the display.

NOTE: Bypassing a day keeps the time clock in the last state it was in prior to the bypassed day.

Set "Time Off"

Press "OK" to repeat Steps 3-6 to program "OFF" (control) cycle.

Enter Any Other Programs

Press "OK" to enter another program cycle or press "MENU" until you reach the standard display.

VIEWING THE CHARGE (ON) AND CONTROL (OFF) CYCLES Top▲

Select "Check"

To view the program settings, press "MENU" until "PROGRAM" is displayed. Press "OK". "NEW" will be displayed. Press the "◄" or "►" button until "CHECK" is displayed.

Press "OK" to view

Continue to press and release "OK" button to review the programs or press "MENU" until you reach the standard display.

CLEARING A SINGLE CHARGE (ON)/CONTROL (OFF) CYCLE Top▲

Select "PROGRAM"

To clear individual program settings, press "MENU" until "PROGRAM" is displayed. Press "OK". "NEW" will be displayed. Press the "◄" or the "►" button until "DELETE" is displayed. Press "OK".

Select Desired Day

"SINGLE" will display. Press "OK" and use the "◄" or the "►" button until the day of the week desired is displayed. Press "OK".

Select "DELETE" 

Use the "◄" or the "►" button to select "DELETE" if clearing the current program setting. Press "OK" and the current program setting will be cleared.

CLEARING ALL CHARGE (ON) AND CONTROL (OFF) CYCLES Top▲

Select "PROGRAM "

To clear all existing program settings, press "MENU" until "PROGRAM" is displayed. Press "OK". "NEW" will be displayed. Press "◄" or "►" button until "DELETE" is displayed. Press "OK".

Select "All"

"SINGLE" will display. Use "◄" or "►" button until "DELETE ALL" is displayed. Press "OK" and "CONFIRM" will display.

Select "OK"

Press "OK" to confirm the clearing of all program settings or press the "MENU" button to escape and not clear any program settings.

OVERRIDES Top▲

Single Cycle Override

To temporarily override a current charge or control cycle, press and release the "◄" and the "►" buttons at the same time. "OVERRI" will appear and the clock will reverse the current program cycle. This override status will remain until the next program cycle time, or it can be canceled by pressing and releasing the "◄" and the "►" buttons at the same time again and "OFF" will display.

Permanent On or Off Override

The time clock can also be placed in a permanent ON (Charge) or permanent OFF (Control) status. To do so, press and hold both the "◄" and the "►" buttons until "PERM ON" or "PERM OFF" is displayed. Follow the same procedure to cancel the override.

FINAL CHECKOUT Top▲

Check Operating Status

The heater(s) should reflect the program time.

  1. During a charge (on) period the heater will display a “C”.

  2. During a control (off) or peak period the heater will display a “P”.

Check Status on Time Clock

The bars on the bar graph on the top side of the display indicate the charge (on) times. The numbers indicate time in 24 hour format (see Figure 1). The “ON/OFF” indicator will reflect the status of the contacts.

  1. “OFF” displayed above the time indicates contacts 2 and 3 are closed (peak time).

  2. “ON” displayed above the time indicates contacts 1 and 2 are closed (off peak or charge time).

  3. The relay only operates when the time clock is energized.

WIRING DIAGRAMS Top▲

EXT series Wiringzoom in on pictureopen image

Figure 2 - EXT Series

120V 1000-Series and 2000-Series wiringzoom in on pictureopen image

Figure 3 - 1000/2000 120V Cord Connected

2000-Series wiringzoom in on pictureopen image

Figure 4 - 2000-Series 240V

CCRP wiringzoom in on pictureopen image

Figure 5 - CCRP

Transceiver wiringzoom in on pictureopen image

Figure 6 - Transceiver (1st Gen)

Transceiver with 7-segment display wiringzoom in on pictureopen image

Figure 7 - Transceiver XCVR2

1200608 Rev 5 - 1/7/2025