THIS PROCEDURE MUST BE PERFORMED BY A QUALIFIED TECHNICIAN.
Applies to Item #1301570 (Single Feed Kit 4130/4140/6140) and Item #1301572 (Single Feed Kit 4120)
THIS PROCEDURE MUST BE PERFORMED BY A QUALIFIED TECHNICIAN.
Applies to Item #1301570 (Single Feed Kit 4130/4140/6140) and Item #1301572 (Single Feed Kit 4120)
 WARNING
HAZARDOUS VOLTAGE: Risk of electric shock. Can cause injury or death. This device may be connected to more than one branch circuit. Disconnect all branch circuits before servicing.
De-energize the system and remove the electrical panel cover.
Locate the circuit breakers and loosen all lug screws.
Locate rear single feed plate (with insulator) and install as follows:
Model 4120 - Insert the right leg of the rear single feed plate into the right lug of the third 60 amp breaker. The other legs on the plate will fit into place on the remaining breakers.
Model 4130/4140 - Insert the left leg of the rear single feed plate into the left lug of the 15 amp breaker. The other legs on the plate will fit into place on the remaining breakers.
NOTE: Do NOT remove insulator from rear single feed plate. This insulator protects circuit from shorting.
Locate front single feed plate (no insulator) and install as follows:
Model 4120 - Insert the left leg of the front single feed plate into the left lug of the 15 amp breaker. The other legs on the plate will fit into place on the remaining breakers.
Model 4130/4140 - Insert the far left leg of the front single feed plate into the right lug of the 15 amp breaker. The other legs on this plate will also fit into place on the 60 amp breaker.
Verify both single feed plates are fully seated into the lugs. Tighten down all lug screws.
Install one leg of the main power source into each of the top lugs of the single feed plates.
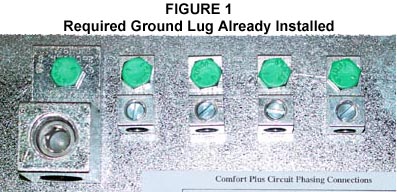
Wire the ground lead into the ground lug.
Visually inspect all uninsulated live terminals to ensure there are no potential line to line and/or line to ground short circuits.
Install electrical panel cover and restore power to the system.
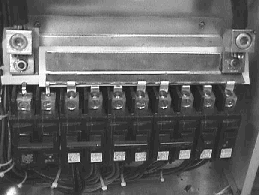
Model 4120 Single Feed Kit Installed:

Model 4130/4140 Single Feed Kit Installed:
1200348 Rev 7 - 10/08/2024