The 2000 series room heating unit MUST be secured for safety purposes. A direct wired heater is secured with a wall support bracket, while a plug-in heater is secured with a security base.
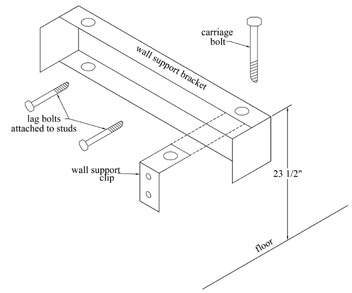
WALL SUPPORT BRACKET
1. Remove the screws at the lower edge of the painted front panel. A plastic grill guard is provided to protect the grill from being scratched while removing the screws.
2. Pull the lower edge of the front panel forward and unhook it from the top panel. Carefully set the front panel aside.
NOTE: If installing a unit with a wall bracket, do step 3. If the room heating unit being installed is equipped with a security base, proceed below.
3. Located in the lower right side of the heater (near the blower) is a package containing the hardware to mount the wall support bracket. The wall support bracket is shipped on the pallet under the room heating unit. Establish room heating unit location. Mark the location on the wall where the wall support bracket will be attached. The top of this should be 23½" from the floor. It must attach securely to wall studs. Pre-drill two 3/16" holes on each side of the bracket. Use the lag bolts provided to attach the wall support bracket to the wall with the label on the bracket facing upward. Use the carriage bolts to secure heater to the bracket.
SECURITY BASE
120V plug-in cord models come equipped with a security base. This base must be attached to the bottom panel of the room heating unit. It is packaged inside the shipping box on the back side of the heater.
1. Gently lay the heater on its back. For ease of installation, slightly elevate the bottom of the heater.
2. Align the holes in the security base with the pre-drilled holes in the bottom of the heater. Using the six #14 x 1¼" sheet metal screws provided in the mounting hardware package, attach the security base to the painted bottom panel.
3. After the base is attached, return the heater to its upright position and place in desired location. DO NOT energize the heater until installation is complete.
 WARNING